/** FileSystem.java **//* 创建FileSystem的工厂方法 */publicstaticFileSystemget(Configurationconf)throwsIOException{returnget(getDefaultUri(conf),conf);}/* 获取配置文件中fs.default.name的值,并转化成一个URI对象 */publicstaticURIgetDefaultUri(Configurationconf){returnURI.create(fixName(conf.get(FS_DEFAULT_NAME_KEY,"file:///")));// FS_DEFAULT_NAME_KEY的值就是fs.default.name}FileSystemget(URIuri,Configurationconf)throwsIOException{Keykey=newKey(uri,conf);FileSystemfs=null;synchronized(this){fs=map.get(key);}if(fs!=null){returnfs;}fs=createFileSystem(uri,conf);// 只关注这个函数synchronized(this){// refetch the lock againFileSystemoldfs=map.get(key);if(oldfs!=null){// a file system is created while lock is releasingfs.close();// close the new file systemreturnoldfs;// return the old file system}// now insert the new file system into the mapif(map.isEmpty()&&!clientFinalizer.isAlive()){Runtime.getRuntime().addShutdownHook(clientFinalizer);}fs.key=key;map.put(key,fs);returnfs;}}privatestaticFileSystemcreateFileSystem(URIuri,Configurationconf)throwsIOException{// 从fs.default.name的值中抽取出scheme部分,也就是开头的那部分。然后从配置文件中找fs.**.impl的值,也就是要实例的类的名字Class<?>clazz=conf.getClass("fs."+uri.getScheme()+".impl",null);LOG.debug("Creating filesystem for "+uri);if(clazz==null){thrownewIOException("No FileSystem for scheme: "+uri.getScheme());}// 反射,根据类名创建类实例FileSystemfs=(FileSystem)ReflectionUtils.newInstance(clazz,conf);fs.initialize(uri,conf);returnfs;}
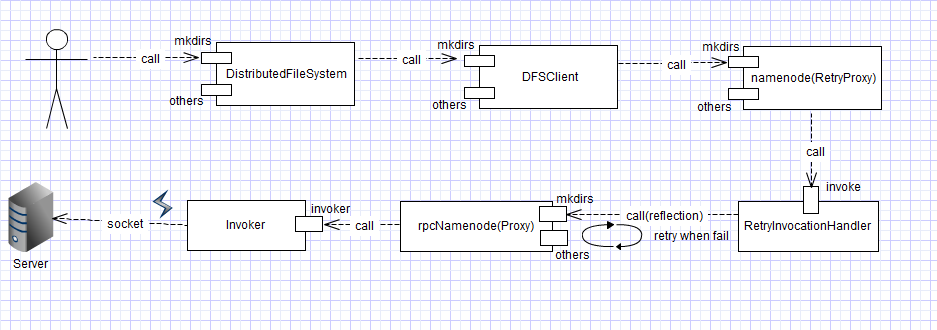
DFSClient can connect to a Hadoop Filesystem and perform basic file tasks. It uses the ClientProtocol to communicate with a NameNode daemon, and connects directly to DataNodes to read/write block data. Hadoop DFS users should obtain an instance of DistributedFileSystem, which uses DFSClient to handle filesystem tasks.
/* DistributedFileSystem.java */publicvoidinitialize(URIuri,Configurationconf)throwsIOException{super.initialize(uri,conf);setConf(conf);Stringhost=uri.getHost();if(host==null){thrownewIOException("Incomplete HDFS URI, no host: "+uri);}InetSocketAddressnamenode=NameNode.getAddress(uri.getAuthority());this.dfs=newDFSClient(namenode,conf,statistics);// 创建了DFSClient的实例this.uri=URI.create(uri.getScheme()+"://"+uri.getAuthority());this.workingDir=getHomeDirectory();}/* DFSClient.java */publicbooleanmkdirs(Stringsrc,FsPermissionpermission)throwsIOException{// omittedreturnnamenode.mkdirs(src,masked);// omitted}/** * Create a new DFSClient connected to the given nameNodeAddr or rpcNamenode.* Exactly one of nameNodeAddr or rpcNamenode must be null.*/DFSClient(InetSocketAddressnameNodeAddr,ClientProtocolrpcNamenode,Configurationconf,FileSystem.Statisticsstats)throwsIOException{// omittedthis.rpcNamenode=createRPCNamenode(nameNodeAddr,conf,ugi);this.namenode=createNamenode(this.rpcNamenode);// omitted}privatestaticClientProtocolcreateRPCNamenode(InetSocketAddressnameNodeAddr,Configurationconf,UserGroupInformationugi)throwsIOException{return(ClientProtocol)RPC.getProxy(ClientProtocol.class,ClientProtocol.versionID,nameNodeAddr,ugi,conf,NetUtils.getSocketFactory(conf,ClientProtocol.class));}/* RPC.java *//** Construct a client-side proxy object that implements the named protocol, * talking to a server at the named address. */publicstaticVersionedProtocolgetProxy(Class<?extendsVersionedProtocol>protocol,longclientVersion,InetSocketAddressaddr,UserGroupInformationticket,Configurationconf,SocketFactoryfactory,intrpcTimeout)throwsIOException{if(UserGroupInformation.isSecurityEnabled()){SaslRpcServer.init(conf);}VersionedProtocolproxy=(VersionedProtocol)Proxy.newProxyInstance(protocol.getClassLoader(),newClass[]{protocol},newInvoker(protocol,addr,ticket,conf,factory,rpcTimeout));longserverVersion=proxy.getProtocolVersion(protocol.getName(),clientVersion);if(serverVersion==clientVersion){returnproxy;}else{thrownewVersionMismatch(protocol.getName(),clientVersion,serverVersion);}}privatestaticClientProtocolcreateNamenode(ClientProtocolrpcNamenode)throwsIOException{RetryPolicycreatePolicy=RetryPolicies.retryUpToMaximumCountWithFixedSleep(5,LEASE_SOFTLIMIT_PERIOD,TimeUnit.MILLISECONDS);Map<Class<?extendsException>,RetryPolicy>remoteExceptionToPolicyMap=newHashMap<Class<?extendsException>,RetryPolicy>();remoteExceptionToPolicyMap.put(AlreadyBeingCreatedException.class,createPolicy);Map<Class<?extendsException>,RetryPolicy>exceptionToPolicyMap=newHashMap<Class<?extendsException>,RetryPolicy>();exceptionToPolicyMap.put(RemoteException.class,RetryPolicies.retryByRemoteException(RetryPolicies.TRY_ONCE_THEN_FAIL,remoteExceptionToPolicyMap));// 控制retry的策略 TRY_ONCE_THEN_FAILRetryPolicymethodPolicy=RetryPolicies.retryByException(RetryPolicies.TRY_ONCE_THEN_FAIL,exceptionToPolicyMap);Map<String,RetryPolicy>methodNameToPolicyMap=newHashMap<String,RetryPolicy>();methodNameToPolicyMap.put("create",methodPolicy);return(ClientProtocol)RetryProxy.create(ClientProtocol.class,rpcNamenode,methodNameToPolicyMap);}
/* RetryProxy.java */publicstaticObjectcreate(Class<?>iface,Objectimplementation,Map<String,RetryPolicy>methodNameToPolicyMap){returnProxy.newProxyInstance(implementation.getClass().getClassLoader(),newClass<?>[]{iface},newRetryInvocationHandler(implementation,methodNameToPolicyMap));}/* RetryInvocationHandler.java */publicObjectinvoke(Objectproxy,Methodmethod,Object[]args)throwsThrowable{RetryPolicypolicy=methodNameToPolicyMap.get(method.getName());if(policy==null){policy=defaultPolicy;}intretries=0;while(true){try{returninvokeMethod(method,args);}catch(Exceptione){if(!policy.shouldRetry(e,retries++)){LOG.info("Exception while invoking "+method.getName()+" of "+implementation.getClass()+". Not retrying."+StringUtils.stringifyException(e));if(!method.getReturnType().equals(Void.TYPE)){throwe;// non-void methods can't fail without an exception}returnnull;}LOG.debug("Exception while invoking "+method.getName()+" of "+implementation.getClass()+". Retrying."+StringUtils.stringifyException(e));}}}privateObjectinvokeMethod(Methodmethod,Object[]args)throwsThrowable{try{if(!method.isAccessible()){method.setAccessible(true);}returnmethod.invoke(implementation,args);}catch(InvocationTargetExceptione){throwe.getCause();}}
/* RPC.java *//** Construct a server for a protocol implementation instance listening on a * port and address, with a secret manager. */publicstaticServergetServer(finalObjectinstance,finalStringbindAddress,finalintport,finalintnumHandlers,finalbooleanverbose,Configurationconf,SecretManager<?extendsTokenIdentifier>secretManager)throwsIOException{returnnewServer(instance,conf,bindAddress,port,numHandlers,verbose,secretManager);}publicstaticclassServerextendsorg.apache.hadoop.ipc.Server{// RPC的一个静态内部类publicServer(Objectinstance,Configurationconf,StringbindAddress,intport,intnumHandlers,booleanverbose,SecretManager<?extendsTokenIdentifier>secretManager)throwsIOException{super(bindAddress,port,Invocation.class,numHandlers,conf,classNameBase(instance.getClass().getName()),secretManager);this.instance=instance;this.verbose=verbose;}}
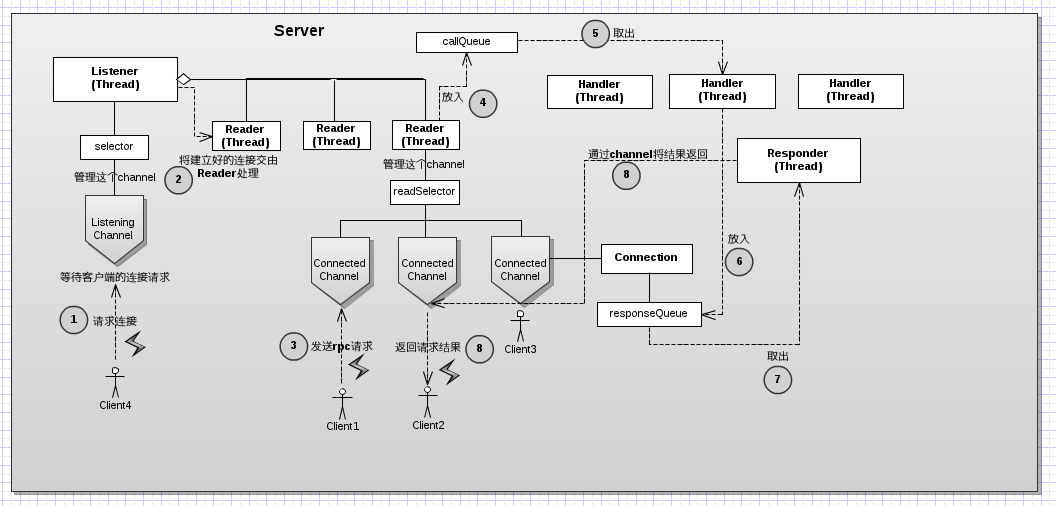
/* Server.java */publicabstractclassServer{privateListenerlistener=null;privateResponderresponder=null;privateintnumConnections=0;privateHandler[]handlers=null;privateBlockingQueue<Call>callQueue;// queued calls/** Starts the service. Must be called before any calls will be handled. */publicsynchronizedvoidstart(){responder.start();listener.start();handlers=newHandler[handlerCount];for(inti=0;i<handlerCount;i++){handlers[i]=newHandler(i);handlers[i].start();}}}
/* Server.java *//** Listens on the socket. Creates jobs for the handler threads*/privateclassListenerextendsThread{privateServerSocketChannelacceptChannel=null;//the accept channelprivateSelectorselector=null;//the selector that we use for the serverprivateReader[]readers=null;// omittedpublicListener()throwsIOException{address=newInetSocketAddress(bindAddress,port);// Create a new server socket and set to non blocking modeacceptChannel=ServerSocketChannel.open();acceptChannel.configureBlocking(false);// Bind the server socket to the local host and portbind(acceptChannel.socket(),address,backlogLength);port=acceptChannel.socket().getLocalPort();//Could be an ephemeral port// create a selector;selector=Selector.open();readers=newReader[readThreads];readPool=Executors.newFixedThreadPool(readThreads);for(inti=0;i<readThreads;i++){SelectorreadSelector=Selector.open();Readerreader=newReader(readSelector);readers[i]=reader;readPool.execute(reader);}// Register accepts on the server socket with the selector.acceptChannel.register(selector,SelectionKey.OP_ACCEPT);this.setName("IPC Server listener on "+port);this.setDaemon(true);}publicvoidrun(){LOG.info(getName()+": starting");SERVER.set(Server.this);while(running){SelectionKeykey=null;try{selector.select();Iterator<SelectionKey>iter=selector.selectedKeys().iterator();while(iter.hasNext()){key=iter.next();iter.remove();try{if(key.isValid()){if(key.isAcceptable())doAccept(key);}}catch(IOExceptione){}key=null;}}catch(OutOfMemoryErrore){// omitted}}// omitted}voiddoAccept(SelectionKeykey)throwsIOException,OutOfMemoryError{Connectionc=null;ServerSocketChannelserver=(ServerSocketChannel)key.channel();SocketChannelchannel;while((channel=server.accept())!=null){channel.configureBlocking(false);channel.socket().setTcpNoDelay(tcpNoDelay);Readerreader=getReader();// 为了让每个reader尽可能平均地分配到channel,目前采用的是round robin方法try{reader.startAdd();SelectionKeyreadKey=reader.registerChannel(channel);// 将这个channel交由reader来处理c=newConnection(readKey,channel,System.currentTimeMillis());readKey.attach(c);synchronized(connectionList){connectionList.add(numConnections,c);numConnections++;}}finally{reader.finishAdd();}}}}
/* Server.java */privateclassReaderimplementsRunnable{privateSelectorreadSelector=null;publicvoidrun(){synchronized(this){while(running){SelectionKeykey=null;try{// 下面都是Selector的典型用法,关键是doRead()函数,这个函数会处理客户端传来的数据readSelector.select();// 当有channel可读后返回Iterator<SelectionKey>iter=readSelector.selectedKeys().iterator();while(iter.hasNext()){key=iter.next();iter.remove();if(key.isValid()){if(key.isReadable()){doRead(key);}}key=null;}}catch(InterruptedExceptione){// omitted}catch(IOExceptionex){LOG.error("Error in Reader",ex);}}}}publicsynchronizedSelectionKeyregisterChannel(SocketChannelchannel)throwsIOException{returnchannel.register(readSelector,SelectionKey.OP_READ);}}voiddoRead(SelectionKeykey)throwsInterruptedException{intcount=0;// 找出目前处理连接对应的Connection,上面提到过对于每一个已建立的连接都会生成一个Connection来表示// 关于Connection类后面还会详细讨论Connectionc=(Connection)key.attachment();try{count=c.readAndProcess();// 交给对应的Connection来处理}catch(InterruptedExceptionieo){// omitted}catch(Exceptione){count=-1;//so that the (count < 0) block is executed}if(count<0){closeConnection(c);c=null;}else{c.setLastContact(System.currentTimeMillis());}}
/* Server.java *//** Handles queued calls . */privateclassHandlerextendsThread{publicvoidrun(){ByteArrayOutputStreambuf=newByteArrayOutputStream(INITIAL_RESP_BUF_SIZE);while(running){try{finalCallcall=callQueue.take();// pop the queue; maybe blocked here 从callQueue中取出一个call进行处理 Writablevalue=null;CurCall.set(call);try{// Make the call as the user via Subject.doAs, thus associating// the call with the Subjectif(call.connection.user==null){value=call(call.connection.protocol,call.param,call.timestamp);// 处理这个call,也就是找到一个合适的对象调用客户端所要求的方法,并传入参数,最终获得结果}else{value=call.connection.user.doAs(newPrivilegedExceptionAction<Writable>(){publicWritablerun()throwsException{// make the callreturncall(call.connection.protocol,call.param,call.timestamp);}});}}catch(Throwablee){// omitted}CurCall.set(null);synchronized(call.connection.responseQueue){// setupResponse() needs to be sync'ed together with // responder.doResponse() since setupResponse may use// SASL to encrypt response data and SASL enforces// its own message ordering.setupResponse(buf,call,(error==null)?Status.SUCCESS:Status.ERROR,value,errorClass,error);// 设置好返回值,也就是说把返回值等信息保存到call对象里。还记得吗,call对象能保存这个call的执行结果// Discard the large buf and reset it back to // smaller size to freeup heapif(buf.size()>maxRespSize){buf=newByteArrayOutputStream(INITIAL_RESP_BUF_SIZE);}responder.doRespond(call);// 处理返回结果}}catch(InterruptedExceptione){if(running){// unexpected -- log it// omitted}}catch(Exceptione){// omitted}}}}
/* Server.java */privateclassResponderextendsThread{privateSelectorwriteSelector;// 和readSelector异曲同工voiddoRespond(Callcall)throwsIOException{synchronized(call.connection.responseQueue){// 将这个call放入其所属的connection(也就是请求这个call的客户端所表示的connection)的responseQueue中等待被处理// responseQueue在之前的Connection的源代码中也有介绍,它和callQueue很类似,只不过一个是全局的,一个是每个Connection都会有一个call.connection.responseQueue.addLast(call);if(call.connection.responseQueue.size()==1){processResponse(call.connection.responseQueue,true);}}}// processResponse()主要做的就是从responseQueue中取一个call,然后获得这个call的调用结果,还记得当时保存进去了吗// 将调用结果传回到客户端,至此一个rpc请求调用圆满完成// 这个函数可能会在两种情况下被调用:一种是在Handler线程中被调用,就像上面的代码所示,另一种就是在Responder线程中被调用,这个待会会见到// inHandler区别是在哪种情况下被调用privatebooleanprocessResponse(LinkedList<Call>responseQueue,booleaninHandler)throwsIOException{booleanerror=true;booleandone=false;// there is more data for this channel.intnumElements=0;Callcall=null;try{synchronized(responseQueue){//// If there are no items for this channel, then we are done//numElements=responseQueue.size();if(numElements==0){error=false;returntrue;// no more data for this channel.}//// Extract the first call//call=responseQueue.removeFirst();SocketChannelchannel=call.connection.channel;//// Send as much data as we can in the non-blocking fashion//intnumBytes=channelWrite(channel,call.response);if(numBytes<0){returntrue;}if(!call.response.hasRemaining()){call.connection.decRpcCount();if(numElements==1){// last call fully processes.done=true;// no more data for this channel.}else{done=false;// more calls pending to be sent.}}else{//// If we were unable to write the entire response out, then // insert in Selector queue. //call.connection.responseQueue.addFirst(call);if(inHandler){// set the serve time when the response has to be sent latercall.timestamp=System.currentTimeMillis();incPending();try{// Wakeup the thread blocked on select, only then can the call // to channel.register() complete.writeSelector.wakeup();channel.register(writeSelector,SelectionKey.OP_WRITE,call);// 让Responder来管理这个channel}catch(ClosedChannelExceptione){//Its ok. channel might be closed else where.done=true;}finally{decPending();}}}error=false;// everything went off well}}finally{closeConnection(call.connection);}returndone;}publicvoidrun(){longlastPurgeTime=0;// last check for old calls.while(running){try{waitPending();// If a channel is being registered, wait.writeSelector.select(PURGE_INTERVAL);Iterator<SelectionKey>iter=writeSelector.selectedKeys().iterator();while(iter.hasNext()){SelectionKeykey=iter.next();iter.remove();try{if(key.isValid()&&key.isWritable()){doAsyncWrite(key);}}catch(IOExceptione){LOG.info(getName()+": doAsyncWrite threw exception "+e);}}// omitted}catch(OutOfMemoryErrore){// omitted}catch(Exceptione){// omitted}}}privatevoiddoAsyncWrite(SelectionKeykey)throwsIOException{Callcall=(Call)key.attachment();if(call==null){return;}if(key.channel()!=call.connection.channel){thrownewIOException("doAsyncWrite: bad channel");}synchronized(call.connection.responseQueue){if(processResponse(call.connection.responseQueue,false)){// 调用processResponse的第二种情况,在Responder线程中调用try{key.interestOps(0);}catch(CancelledKeyExceptione){// omitted}}}}}
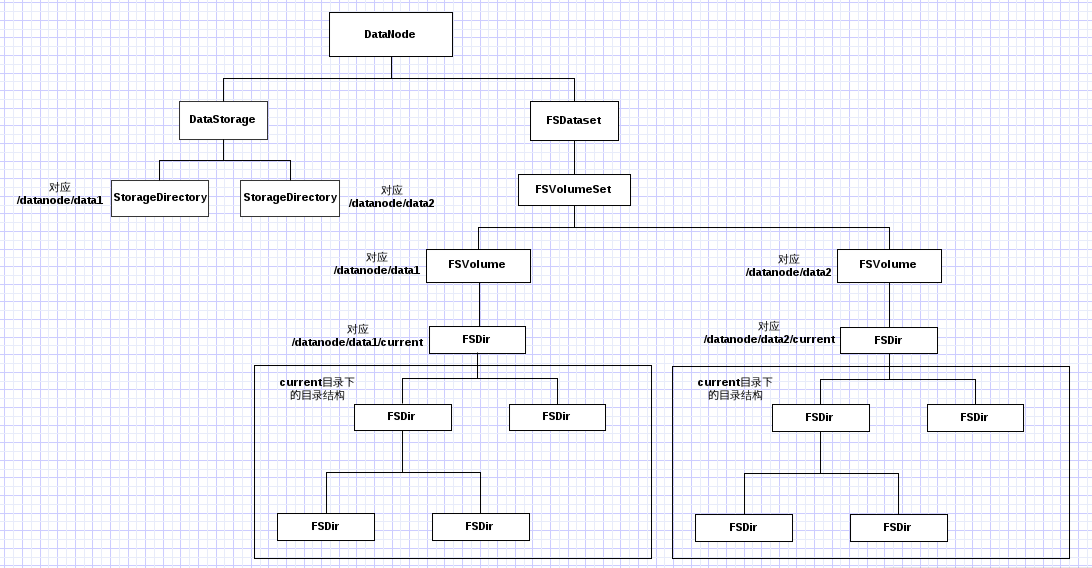
/* DataNode.java */publicstaticvoidmain(Stringargs[]){secureMain(args,null);}publicstaticvoidsecureMain(String[]args,SecureResourcesresources){try{DataNodedatanode=createDataNode(args,null,resources);if(datanode!=null)datanode.join();// 等待DataNode的Daemon进程结束}catch(Throwablee){System.exit(-1);}finally{System.exit(0);}}publicstaticDataNodecreateDataNode(Stringargs[],Configurationconf,SecureResourcesresources)throwsIOException{DataNodedn=instantiateDataNode(args,conf,resources);runDatanodeDaemon(dn);// 把DataNode当作一个Daemon进程启动,运行DataNode.run()方法returndn;}publicstaticDataNodeinstantiateDataNode(Stringargs[],Configurationconf,SecureResourcesresources)throwsIOException{String[]dataDirs=conf.getStrings(DATA_DIR_KEY);// 获取配置项dfs.data.dir的值,也就是DataNode中存放数据的目录returnmakeInstance(dataDirs,conf,resources);}publicstaticDataNodemakeInstance(String[]dataDirs,Configurationconf,SecureResourcesresources)throwsIOException{LocalFileSystemlocalFS=FileSystem.getLocal(conf);ArrayList<File>dirs=newArrayList<File>();for(Stringdir:dataDirs){try{// 检查配置项dfs.data.dir中给出的路径是否valid,比如确实是个目录而不是文件DiskChecker.checkDir(localFS,newPath(dir),dataDirPermission);dirs.add(newFile(dir));}catch(IOExceptione){// omitted}}if(dirs.size()>0)// 至少要存在一个valid的目录,不然。。。returnnewDataNode(conf,dirs,resources);returnnull;}DataNode(finalConfigurationconf,finalAbstractList<File>dataDirs,SecureResourcesresources)throwsIOException{super(conf);try{startDataNode(conf,dataDirs,resources);}catch(IOExceptionie){shutdown();throwie;}}// 启动的主要工作都在这里voidstartDataNode(Configurationconf,AbstractList<File>dataDirs,SecureResourcesresources)throwsIOException{// use configured nameserver & interface to get local hostnameif(conf.get("slave.host.name")!=null){machineName=conf.get("slave.host.name");}InetSocketAddressnameNodeAddr=NameNode.getServiceAddress(conf,true);InetSocketAddresssocAddr=DataNode.getStreamingAddr(conf);inttmpPort=socAddr.getPort();storage=newDataStorage();// construct registrationthis.dnRegistration=newDatanodeRegistration(machineName+":"+tmpPort);// connect to name nodethis.namenode=(DatanodeProtocol)// 有没有很熟悉,和之前客户端向NameNode发送rpc请求的原理差不多RPC.waitForProxy(DatanodeProtocol.class,DatanodeProtocol.versionID,nameNodeAddr,conf);// get version and id info from the name-nodeNamespaceInfonsInfo=handshake();// 获取NameNode的版本信息,用来确保DataNode和NameNode的版本是一样的StartupOptionstartOpt=getStartupOption(conf);// read storage info, lock data dirs and transition fs state if necessarystorage.recoverTransitionRead(nsInfo,dataDirs,startOpt);// adjustthis.dnRegistration.setStorageInfo(storage);// 创建一个FSDataset实例,创建完成后FSDataset内部就会有像上一节那样的图了this.data=newFSDataset(storage,conf);// find free port or use privileged port provideServerSocketss;if(secureResources==null){ss=(socketWriteTimeout>0)?ServerSocketChannel.open().socket():newServerSocket();Server.bind(ss,socAddr,0);}else{ss=resources.getStreamingSocket();}// adjust machine name with the actual porttmpPort=ss.getLocalPort();selfAddr=newInetSocketAddress(ss.getInetAddress().getHostAddress(),tmpPort);this.threadGroup=newThreadGroup("dataXceiverServer");// 这个服务器是用来处理Client或者其他DataNode对于Block文件的处理请求,比如要求发送某个Block文件的内容// 这个服务器上使用的不是RPC机制而是一种流式机制,因为要传输Block文件的内容嘛this.dataXceiverServer=newDaemon(threadGroup,newDataXceiverServer(ss,conf,this));DataNode.nameNodeAddr=nameNodeAddr;//initialize periodic block scanner// 单独的一个线程,定期对所有的Block文件进行扫描校验blockScanner=newDataBlockScanner(this,(FSDataset)data,conf);//create a servlet to serve full-file content// 开启一个web服务器,运行通过浏览器来获得DataNode的状态this.infoServer=(secureResources==null)?newHttpServer("datanode",infoHost,tmpInfoPort,tmpInfoPort==0,conf,SecurityUtil.getAdminAcls(conf,DFSConfigKeys.DFS_ADMIN)):newHttpServer("datanode",infoHost,tmpInfoPort,tmpInfoPort==0,conf,SecurityUtil.getAdminAcls(conf,DFSConfigKeys.DFS_ADMIN),secureResources.getListener());this.infoServer.addServlet(null,"/blockScannerReport",DataBlockScanner.Servlet.class);this.infoServer.start();// BlockTokenSecretManager is created here, but it shouldn't be// used until it is initialized in register().this.blockTokenSecretManager=newBlockTokenSecretManager(false,0,0);//init ipc serverInetSocketAddressipcAddr=NetUtils.createSocketAddr(conf.get("dfs.datanode.ipc.address"));// 这个RPC服务器和NameNode上的RPC服务器是一样的实现ipcServer=RPC.getServer(this,ipcAddr.getHostName(),ipcAddr.getPort(),conf.getInt("dfs.datanode.handler.count",3),false,conf,blockTokenSecretManager);}
/* DataNode.java */publicvoidrun(){dataXceiverServer.start();ipcServer.start();while(shouldRun){try{startDistributedUpgradeIfNeeded();offerService();// 主要是这个函数}catch(Exceptionex){if(shouldRun){try{Thread.sleep(5000);}catch(InterruptedExceptionie){}}}}shutdown();}/** * Main loop for the DataNode. Runs until shutdown, * forever calling remote NameNode functions. */publicvoidofferService()throwsException{while(shouldRun){try{longstartTime=now();// 过一段时间执行一次if(startTime-lastHeartbeat>heartBeatInterval){//// All heartbeat messages include following info:// -- Datanode name// -- data transfer port// -- Total capacity// -- Bytes remaining//lastHeartbeat=startTime;// 发送心跳包表明DataNode还活着,同时获得NameNode传给DataNode的指令// NameNode和DataNode遵循严格的C/S架构,NameNode不会主动去联系DataNode的// 只有在DataNode联系它的时候才借机传输点命令给DataNodeDatanodeCommand[]cmds=namenode.sendHeartbeat(dnRegistration,data.getCapacity(),data.getDfsUsed(),data.getRemaining(),xmitsInProgress.get(),getXceiverCount());if(!processCommand(cmds))continue;}// check if there are newly received blocksBlock[]blockArray=null;String[]delHintArray=null;synchronized(receivedBlockList){synchronized(delHints){intnumBlocks=receivedBlockList.size();if(numBlocks>0){//// Send newly-received blockids to namenode//blockArray=receivedBlockList.toArray(newBlock[numBlocks]);delHintArray=delHints.toArray(newString[numBlocks]);}}}if(blockArray!=null){// 告诉NameNode最新接收到的Block文件namenode.blockReceived(dnRegistration,blockArray,delHintArray);synchronized(receivedBlockList){synchronized(delHints){for(inti=0;i<blockArray.length;i++){receivedBlockList.remove(blockArray[i]);delHints.remove(delHintArray[i]);}}}}// Send latest blockinfo report if timer has expired.if(startTime-lastBlockReport>blockReportInterval){if(data.isAsyncBlockReportReady()){// Create block reportlongbrCreateStartTime=now();Block[]bReport=data.retrieveAsyncBlockReport();// Send block reportlongbrSendStartTime=now();// 报告Block文件的信息DatanodeCommandcmd=namenode.blockReport(dnRegistration,BlockListAsLongs.convertToArrayLongs(bReport));// omittedprocessCommand(cmd);}else{data.requestAsyncBlockReport();if(lastBlockReport>0){// this isn't the first report// omitted}}}// start block scanner// 只会执行一次if(blockScanner!=null&&blockScannerThread==null&&upgradeManager.isUpgradeCompleted()){blockScannerThread=newDaemon(blockScanner);blockScannerThread.start();}//// There is no work to do; sleep until hearbeat timer elapses, // or work arrives, and then iterate again.//longwaitTime=heartBeatInterval-(System.currentTimeMillis()-lastHeartbeat);synchronized(receivedBlockList){if(waitTime>0&&receivedBlockList.size()==0){try{receivedBlockList.wait(waitTime);}catch(InterruptedExceptionie){}delayBeforeBlockReceived();}}// synchronized}catch(RemoteExceptionre){// omitted}catch(IOExceptione){}}// while (shouldRun)}// offerService